For many parts in industrial production, a surface is created by many process steps: casting or forming, machining, grinding, polishing, painting, finishing, and coating of different materials. Each step requires feedback and quality control.
Visual inspection is critical in determining airfoil surface quality. The many complex manufacturing steps that go into the production of an airfoil leave plenty of opportunity for the occurrence of defects. The later in the process a defect is detected, the more costly it becomes. Conventional visual inspection methods are notoriously unreliable.
Escapes, defective parts that are missed in the quality check, can critically affect the performance of an airfoil in an engine. Overkill, rejecting good parts, are costly to the manufacturer and challenging with manual visual inspection techniques.
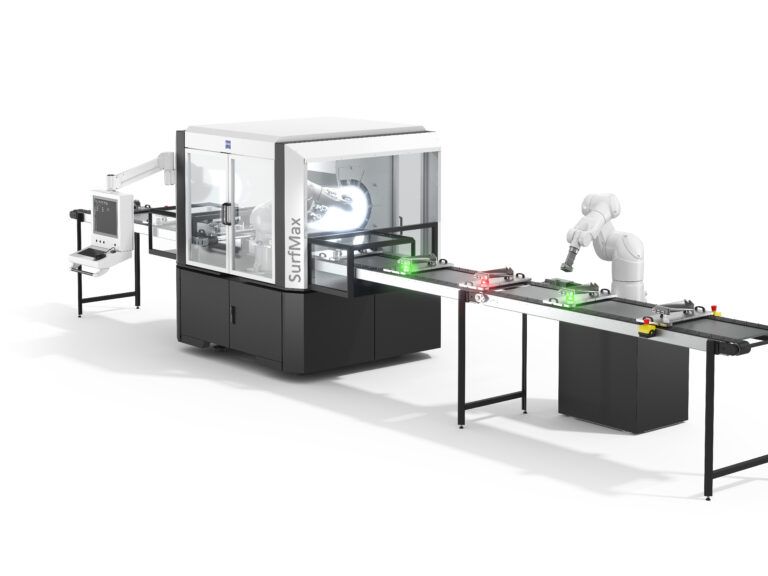
ZEISS SurfMax offers a reliable high-speed inline solution for the visual inspection of airfoils and many other critical aerospace components. Material finishes and coatings from matte to high polish may be evaluated by the technology.
ZEISS SurfMax R-Series images and evaluates complex geometries in multiple channels: greyscale, gloss, and slope, which allow minute defects to be identified and differentiated. Its software not only identifies and categorizes these anomalies, but it also has the ability to determine the severity of the defect by means of production defined sensitivity settings. This capability allows ZEISS SurfMax to distinguish the difference between real defects and acceptable surface imperfections to eliminate overkill and escapes. Through tailored algorithms and machine learning, ZEISS SurfMax has changed visual inspection from a subjective art into a predictable science.
Grayscale provides information related to changes in white light reflectivity and emphasizes defects such as discoloration, dot imperfections, and part contours.
Gloss provides detailed information on the level of gloss and emphasizes defects such as scratch, texture nonuniformity, residues and even fingerprints, based on how much light scattering is observed.
Slope provides consistent evaluation of surface topography and form at localized regions and highlights defects including dents, deep scratches, orange peel and other form- and shape-related errors. Using these information channels, surface imperfections are identified, classified as a specific defect type, and evaluated as OK or NG (Not Good) based on the severity of the imperfection.
By creating a digital library of defects, ZEISS SurfMax offers 100% traceability and the opportunity to identify trends in the manufacturing process. ZEISS PiWeb allows the user to plot and view defect images and classification on the CAD model. Specific defects may be isolated during batch run analysis to detect and correct patterns in the production process.
ZEISS SurfMax R Series is designed to provide inspection of complex part geometries or multiple variants of a part within a given part family. Automatic robot handling allows for consistent and optimized part alignment within the inspection tunnel for accurate and repeatable inspections.
Two models are available depending on the size of the parts for inspection: the ZEISS SurfMax R150 for parts which have a width of up to 150mm and the ZEISS SurfMax R250 for parts with a width of up to 300mm. Isolated point-like defects with a lateral size of 25 μm can be consistently detected by ZEISS SurfMax R Series.
Customizable options are available to fit existing workflows, including infeed and outfeed material handling of parts, custom end-of-arm tools, fixturing, pallets, trays, and sorting and verification systems.
This article was provided by ZEISS Industrial Quality Solutions
