Paul Mortlock, managing director at Frazer-Nash Manufacturing discusses the importance of ensuring that even the most humble of components is fit for purpose and lessons learned on achieving this from a specialist engineering sub-contractor’s perspective.
There’s been much discussion about the opportunities of manufacturing in space, with the focus often being on different forms of additive manufacturing, from powder bed to wire arc. However, most of the engineering work for the space sector takes place at ground level, at normal atmospheric pressure and under usually benign environmental conditions.
Attention to detail
Although a preacher might not have been quoted in Aerospace Testing International before, what Charles R Swindoll said stands as true for testing as it does for life: “The difference between something good and something great is attention to detail.” When it comes to aerospace testing, evaluation and inspection, it is attention to detail with every single component, that is the secret to trouble-free success.
To ensure that parts and assemblies pass testing however, attention to detail starts all the way back with the component engineers and the processes that they put in place to ensure that quality is a priority on every job. From helping create Tokamak Energy’s fusion power plants of tomorrow and facilitating Oxford Space Systems in delivering their game-changing deployable antennas, to being a key supplier to CERN, Frazer-Nash Manufacturing has learnt the importance of paying attention when processing even the simplest of parts.
For ultimate quality, attention to detail has to start from the moment the customer’s design specifications are received for engineering. For example, mistakes can be avoided if specified flatness and accuracy tolerances are assessed to see if they are achievable and the machining process evaluated to ensure successful manufacturing. Also, whether using traditional materials such as aluminium, titanium and stainless steel, or more demanding ones such as invar and Wolfmet tungsten alloys, advising on the grades of the metal to be machined so that specified tolerance levels can be achieved is essential.
Processing challenges
When it comes to space component production, there has been a drive to move towards commercial off the shelf (COTS) parts, due to their faster time to market and production cost benefits. However, the continual battle between standardization and the adjustments that need to be made for each satellite’s requirement has meant that for companies such as Frazer-Nash Manufacturing, there is no such thing as a ‘traditional component’. The majority of specifications are for something new and this means quality checks need to be continually monitored.
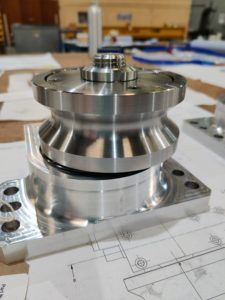
Even though materials traditionally come with a mill certificate that gives its chemical composition and grade, there can be differences in how the same batch will perform when machined. This is influenced by where the material was when it was cast in the block, its grain and where it is sawn. Mismanagement of the cutting process can lead to a component warping. As precision in space components is key, it is not unusual for Frazer-Nash Manufacturing’s team to spend as long setting up the job actually machining it. Whether the material being processed is exotic or traditional, rough cutting also helps to minimize the risk of warping. This process of machining the component gradually closer and closer to its specification, whilst the part is regularly released from its clamps and turned and flipped, is key to the accuracy of the finished piece.
Internal testing
Although a component isn’t put through its paces properly until it is in situ, some testing does occur before it is delivered to the customer. In the case of Frazer-Nash Manufacturing, components are generally agreed to within a few microns (usually +/- 10 microns) of deviation from design specifications. To ensure that these have been achieved, the component is measured throughout the machining process. As well as doing any necessary fit checks, to ensure that the component goes together smoothly, pieces may be stress- and strain-tested, with hardness also being analysed using a TIME portable hardness tester. Final physical checks are made using a coordinate-measuring machine, to ensure that nothing has been distorted during the machining process and this entire checking procedure occurs, whether the component is being machined or 3D printed.
To ensure every component has been fully checked for accuracy to the agreed design specification, the company also builds fixed inspection stages into the component production process — before the next procedure can begin. As well as minimizing testing issues later down the line, having a trackable history also means that when information is needed by the customer on the position of a specific hole, or the component’s hardness for example, it is easy and quick to access.
Tailored testing
To smooth the testing process still further, some customers request specific processes be put in place during component production. For example, one rocket engine customer requires their complex 3D printed components to be processed using wax to seal the water ways and cooling channels during cutting. This avoids swarf potentially blocking any of the parts and photographic and video evidence is produced to show compliance. Once the wax has been soaked off of the components, they are measured and then put in sealed boxes before being sent to the customer.
A case in point
In-Space Missions, a world class expert in the design, build and operation of bespoke physical and digital customer missions, understands and appreciates the importance of ensuring every component has been tested fully before it goes into orbit. Having used Frazer-Nash to manufacture a wide range of components including closure panels and PCB mounting brackets, In-Space had to be sure that all these components were fit for purpose before they were included in the company’s Faraday-1 Phoenix satellite, which launched in June 2021.
When receiving a product from any of its manufacturing suppliers, In-Space performs strict measurement and fit checks, to ensure that the component is capable of the job it has been designed to do. As AIT engineer, Louis Parisi comments: “It’s important that a component meets specification — through our own measuring and fitting checks — before being subjected to vibration testing. As it’s crucial that the parts don’t move within the satellite.”
Component testing is a key step in the design and build process, because If a component fits loosely, it can cause vibration issues and place undue stresses on the spacecraft. Also, if a mechanical issue arises once a satellite reaches space, it is impossible to rectify. This is why every piece of hardware and software is subject to rigorous environmental testing in specially designed vibration and EMC (Electromagnetic Compatibility) facilities located in the UK.
Although component machining might not be front of mind when manufacturing for space, as can be seen, attention to detail even in these areas is key. With strong supplier partnerships and precision production, the door is opened to more straightforward, trouble-free testing that not only saves time, but money too.


