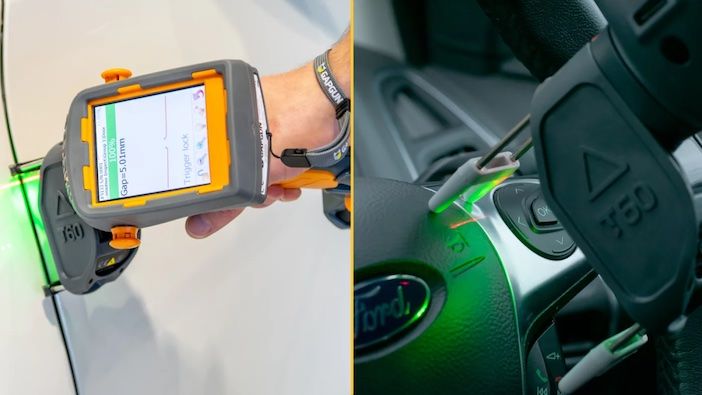
Using triangulation methods to measure distance is nothing new: in fact, the technology has been used for centuries, for everything from land surveying to astrology.
While the concept – using trigonometry principles and, in the case of laser triangulation, optics, to determine the position and shape of an object – may be simple, contemporary applications are still evolving, including in the aerospace industry, where the technique is used by OEMs as well as Tier 1s and 2s.
Laser triangulation technology offers several advantages for aerospace applications. It provides fast and non-contact measurements, allowing for high-speed inspections and minimizing the risk of damaging delicate objects, such as the composite materials used on aircraft. Enhanced traceability, which is built into laser triangulation tools such as the GapGun, is also crucial for guaranteeing safety, enabling anyone along the supply chain to identify defective parts before they are installed and pose a safety risk.
But while the applications and advantages are evident now, this was not always the case.
What is laser triangulation?
The basic setup of a laser triangulation system includes a laser source, a detector, and associated optics. The laser emits a narrow beam of light that is directed toward the object being measured. The laser beam interacts with the surface of the object and forms a spot or line depending on the optics used.
The reflected light from the object is captured by a detector, which can be a photodiode or a camera sensor. The detector converts the light intensity into an electrical signal that can be processed and analyzed. The position of the laser spot or line on the detector provides information about the object’s distance and shape.
To determine the distance to the object, the system measures the displacement of the laser spot or line on the detector. This displacement is caused by the change in the angle between the emitted and reflected laser beams. By knowing the distance between the laser source and the detector and the displacement of the spot or line on the detector, the system can calculate the distance to the object using trigonometric principles.
Additionally, the shape and profile of the object can be obtained by analyzing the deformation of the laser spot or line on the detector. Variations in the shape of the object result in changes in the reflected laser beam, leading to corresponding changes in the spot or line shape on the detector. This information can be used to reconstruct the surface profile and detect any deviations from the desired dimensions.
The accuracy of the measurements depends on factors such as the quality of the optics, the resolution of the detector, and the stability of the system.
Enabling wider adoption of laser triangulation in the aerospace sector
Despite the evident advantages of laser triangulation for the fine-tuned measurements that are so critical for aircraft, the adoption of this technology has still faced challenges, which are reflected in the experiences I faced when building Third Dimension.
- Resistance to change: Many industries have established processes and systems that have been in place for a long time. Employees and stakeholders tend to resist adopting new innovations because they are comfortable with the existing way of doing things or fear the uncertainties that come with change. In the metrology industry, this means a number of organizations still use gages and calipers, which allow for human error.
- Cost and investment: Adopting innovation often requires significant investment in terms of time, money, and resources. Companies may hesitate to allocate resources to new technologies or processes if they are unsure about the return on investment or face budget constraints. For smaller Tier 1s or Tier 2s in the sector, the costs associated with adopting new metrology solutions may be too great.
- Compatibility and integration: Existing systems, infrastructure, and processes may not be compatible with new innovations. Integration challenges can arise when trying to incorporate new technologies with legacy systems or when different innovations need to work together seamlessly. This is particularly a challenge in highly complex sectors such as aerospace, where different players in the value chain may need to integrate into a single system to ensure traceability.
- Regulatory and legal barriers: Highly technical and complex industries operate under strict regulations and standards. Compliance with these regulations can slow down the adoption of new technologies or require additional approvals and certifications, which can be time-consuming and costly.
Risk aversion: Companies may be risk-averse and reluctant to adopt new innovations due to concerns about potential failures, disruption of operations, or negative impacts on their reputation. They may prefer to wait until an innovation has been proven and adopted widely by others in the industry, leading to a slow uptake. - Lack of skilled workforce: Adopting new technologies or processes may require a skilled workforce with expertise in those areas. If there is a shortage of skilled professionals or a knowledge gap, it can be challenging for companies to implement innovations such as new metrology tools effectively.
Project cycles: in aerospace, project cycles are long, and new technologies are not often adopted outside of these cycles.
Getting the GapGun and Vectro tools into the manufacturing processes of OEMS in the aerospace sector such as Lockheed Martin and Airbus required overcoming many of these interconnected barriers. Now that the sector is changing, the need for laser triangulation is evolving further.
The future of laser triangulation for aerospace
Many of the features of the aerospace sector stem from the fact it has always been low-volume: this means that while high-value, certain drivers of efficiency that exist in other markets like automotive or white goods are not as prominent.
However, sustainable aviation fuels are set to disrupt the sector, as other innovations such as the Internet of Things and materials such as composites and 3D manufactured parts are already doing. Both will alter the design and manufacture of aircraft, and require ways of measuring and providing quality control that respond to these needs, where safety and traceability will remain paramount. This means there will be an even greater need for effective laser triangulation tools, and for businesses in the aerospace sector who are prepared to collaborate and innovate together.


